Category Archives: TIPS AND TRICKS


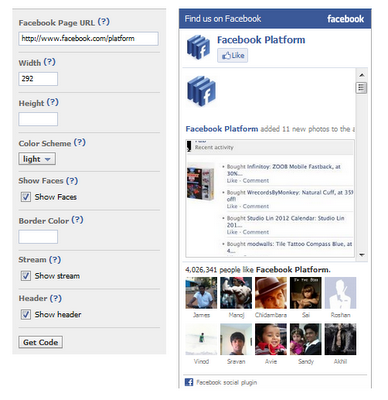
How To Add Facebook Like Box To Your Blog Or Website
Here are some simple steps to add Like box to your website or blog: Continue reading

How To Boot From An USB Device | How To Make A Pendrive Bootable
How to make a bootable USB device:
There are many tools like “windows 7 usb/dvd download tool” and “gburner” available to make an USB device into bootable.
Here i am going to use “windows 7 usb/dvd download tool” to make USB device bootable. you can download the tool from this link: windows 7 usb/dvd download tool
1. Download and install the tool and launch it after installation. Browse and select the image file of windows and click on “next”.
2. In the next step you need to select “USB device”.
3. Now, you need to select the target USB drive and click on “Begin copying”. This is what the final step in making the USB device bootable. In the 4th step you need to do nothing else than waiting until the process reaches to 100%.
4. When the USB drive is ready, connect it to the required system and start it. Now, you can see the system booting from the USB device.
NOTE: Make sure that the First bootable device is “USB HDD”.

Fun!! – Rotate Your Display To What Ever The Side You Like
Method-1:
1. Right click on your desktop, and choose “Graphics options” > “Graphic Properties”.
2. Now you can see a popup window opened and select “Rotation” tab in that window.
3. Finally, choose the type of rotation you need, apply the changes and you can see your desktop screen rotated.
Method-2:
1. The second method is by using shortcut keys.
2. ctrl + alt + right arrow => Rotates 90′ clockwise.
3. ctrl + alt + left arrow => Rotates 90′ anticlockwise.
4. ctrl + alt + down arrow => Reverse Screen.
5. ctrl + alt + up arrow => Normal screen.
Have fun rotating the desktop’s screen…

How To Reduce Size Of Raw Images
1. The first step you need to do is to download and install picasa.
2. If already imported, Select pictures whose size is to be reduced else import pictures and select files.
3. After selecting, click on “file” tab and select “export picture to folder” option.
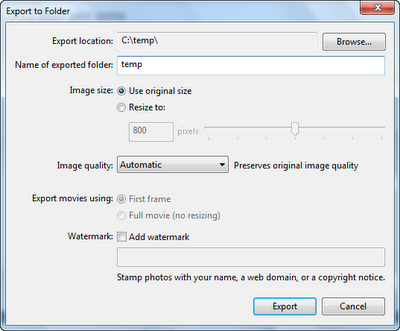
4. Now, you can see a window opened in which you can select “size to be reduced” and folder in which files are to be exported. It is also possible to select image quality in that window. The window is shown below.
5. Click on “Export” button and now you can find the pictures exported to the specified folder with reduced size.


